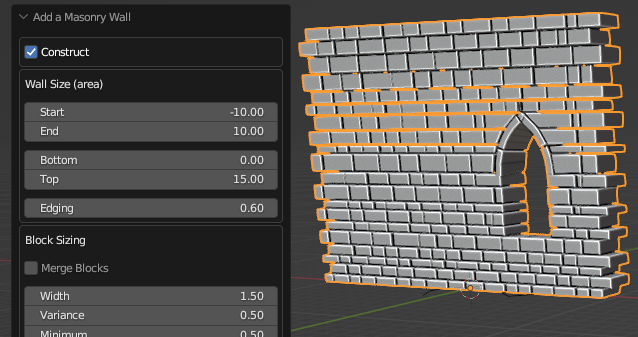
and the UI looks like this now
You can see some more recent renderings in the Auto Masonry image gallery.
Okay, back to the original article!
I've always liked castles. When I started doing 3d modeling I used
a tool called "Ray Dream Designer" and the first tutorial I
did was making a castle. It was a wimpy castle, with flat poorly
textured walls, no windows, etc. One thing that has always bugged me
is that castle wall models tend to be textured planes, perhaps
whitewashed with cornerstones modeled. Real castles have every stone
showing, uneven rows and stone sizes, etc. The pure texture version
looks good from a distance, but you can't get close to them without
the sham appearing. It's also hard to knock out a few blocks, or add
siege damage. I've always dreamed of building a castle that would
stand up to scrutiny, but the tools at hand were insufficient. I
wasn't going to build it block by block!
Anyway, I gave up on the
dream for a while, moved on to newer software versions, and
eventually switched to Blender. With the presence of the Python
extension language my dream re-surfaced. If the computer could do the
grunt work, then all I'd have to do is the overall design and touch
up work. Score! I looked around to see if anyone else had done this
already, but I couldn't find anything similar to what I wanted. This
confused me, it seemed like a simple problem to solve. More than six
hundred lines of code later I discovered why it may not have been as
simple as I expected.
What follows is my first major foray into
python scripting and the results. A section on how to use the script
comes first, followed by a short history of the coding, and some
things I learned in the process. I'm not fully satisfied with the
script yet, but it is very usable and I hope will be useful to many
of you.
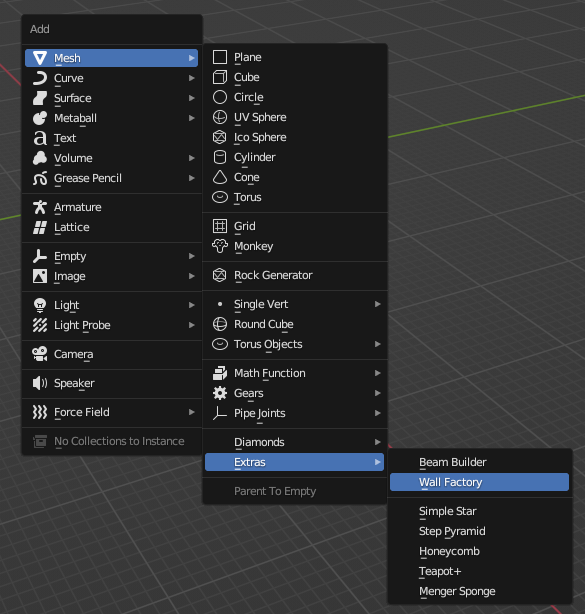
NOTE: this article was written 2007-10-31, so the UI has been updated since then. The script is now a pack-in add-on in Blender, part of the "Add Mesh: Extra Objects" add-on. The add-on can be found here:
and the UI looks like this now
You can see some more recent renderings in the Auto Masonry image gallery.
Okay, back to the original article!
Let's jump straight into the fun stuff shall we? If you don't have
it, download the current version of the script and place it in your
scripts path folder (Normally "...Blender/.blender/scripts").
To start the script, open a "Scripts" window and select
"Scripts>>Wizards>>Auto Masonry". You should
see something like this: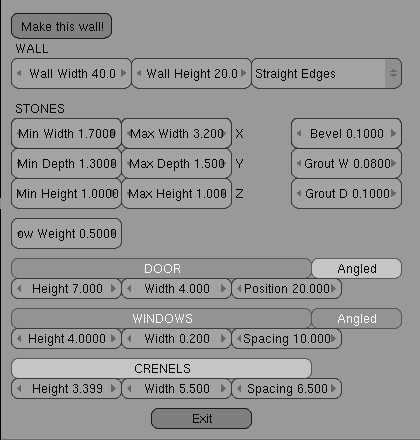
It's
the default GUI. If you press "Make this wall!" you should
end up with something like this.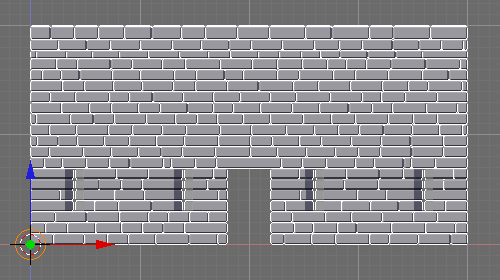
If
you don't, you may need to install Python. If that doesn't work, I
may need to fix the script. The current incarnation allows you to
make walls with or without rectangular windows, doors, and
crenelations. The script generates two mesh objects, a "wall"
and a "grout".
All of the buttons and options have
explanatory pop-up text, so feel free to try it without reading this
whole tedious section.
If you're not feeling quite that bold,
here is an explanation of all the options in the GUI.
"Make
this wall!": This button generates the wall which conforms to
the options you have selected. If there is a curve selected, the wall
length will be set to the curve length, the wall will deform to
follow the curve, and have the curve as a parent. This means that all
of the pos/rot/size of the curve will be applied to the wall as well.
If the curve is closed the script will assume that it is a perfect
circle. If the curve is not a circle, the wall probably won't be the
right length.
"WALL": These settings govern the overall
size of the wall in blender units. The "Wall Height" does
not include crenels.
"Straight Edges/Offset Edges":
Basically, if you want to make a closed loop wall set it to Offset
Edges, otherwise Straight Edges.
"STONES": these
settings govern the range of the size of the stones. "Depth"
will also set the thickness of the wall. The stones may exceed these
limits at the edges, to make everything fit, or due to the "Row
Weight" setting. These settings are for the centerline of the
grout, so a larger "Grout W" will reduce the actual size of
the stones.
"Bevel": The size of the bevel. If set to
zero the stones will have square corners, useful for reducing
poly-count.
"Grout W": The width of the grout, pretty
straight forward.
"Grout D": How far the grout is offset
from the face of the stones. This references the value "Min
Depth" so if there is a large range in depth the grout will be
quite far back on the thicker stones.
"Row Weight": This
setting governs how much the height of the row affects the width of
the stones in that row. Positive values are normal (taller stones,
wider stones), but negative values are valid as well (taller stones,
narrower stones). I usually set it between 0.0 and 1, depending on
the application.
"DOOR" and "WINDOW": These
settings behave very much the same. Turn on and off a door or windows
by pushing the big button labeled "DOOR" or "WINDOWS"
respectively. Door "Position" is from the origin to the
center of the door. Height and Width behave as you would expect.
Window spacing will be centered between the edges, and the edges of
the door (if one is present). The top of the windows will be at the
door "Height" setting, even if doors are turned off. This
means that door and window lintels have the same height (generally
true in architecture). The "Angled" button toggles an angle
along the sides of the door/window, such as would be present in a
castle arrow slit. Generally, doors do not have angles like this, but
I left it as an option, just in case you want it.
"CRENELS":
The crowning part of the wall, crenels are often seen on castle
walls. Height width and spacing work the reverse of windows, setting
the size of the stone portions, not the openings. Crenels are always
angled, though I'll add an option to control this in the
future.
"Exit": This button fires the masons and lets
you do the work yourself. Very useful if you are done creating stone
structures just at present.
The script is rather fast, so you can
make very large walls if you want. I think this one took thirty
seconds to generate.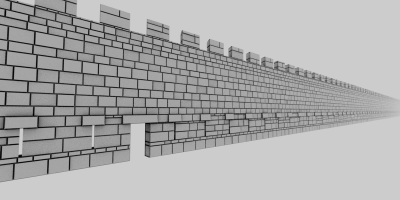
Here are a few tricks I've come up with. I suspect ingenious users
will come up with many more.
Paths: Make a narrow tall wall with
no windows, doors, or crenels and set it to follow a curve on the Z
axis. It's a path, street, or cobblestone highway!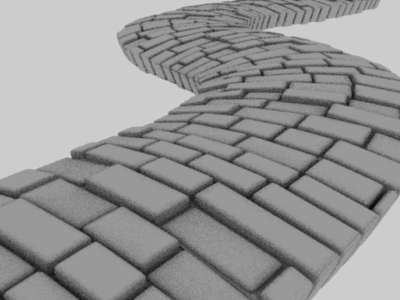
Support
Beams: Crenels can also be made to hold support beams for multi-story
castle towers, siege defense structures, etc.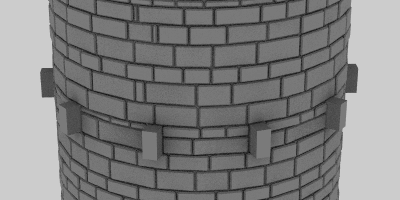
Multi
wall: You can build a wall in multiple segments. This allows several
different styles of windows and doors stacked or strung together. The
example for the Support Beams was actually created by stacking two
walls on top of each other.
Sub Surf: The script automatically
sets all edge crease values to 0.5 which results in a pretty good
sub-surf results.
Texture bake: Render the Z value of the wall on
an isometric view and save it to a texture. Now you can use this as a
bump channel or texture mask for a low-poly wall. Using "Offset
Edges" and correct clipping allows seamless tiling!
Multiple
Curve Deformers: Often walls are tapered or curved. By applying a
Z-axis curve deformer above the X-axis one many wall effects can be
achieved. This can also be used to make more realistic streets (see
the curved profile of the path example), or cartoony towers.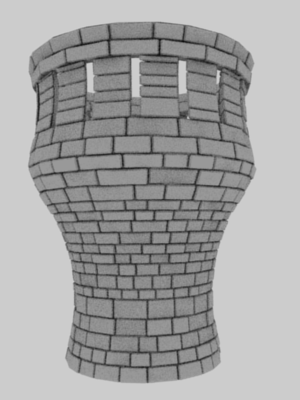
If you are still reading this, you may be interested in how the
script was programed. The code is decently well documented, so feel
free to jump right in and fiddle around with it. Here's a little
background on how I wrote it as well as a few lessons I learned. Some
of this is just good programming practice, some is specific to
Blender.
Before I could program anything I had to learn Python. In
college I took a computer programming course, and I've done a bit of
programming in my spare time, so there was some background to build
on. Essentially, all programming languages are expressions of a
logical progression, and Python is no different. I worked through the
built in "Getting Started" tutorial in Python, wrote a few
small applications to play with features, and got comfortable with
the syntax. At this point I started to ease into Blender python
extensions. My first Blender script took a mesh object and created
every possible polygon with the existing verticies. Not to useful,
but rather fun. I also discovered that you can crash Blender by
trying to make a mesh object with too many polygons.
At this stage
I was also examining a lot of the scripts included in Blender. Here
are the first two things I learned about programming Python
extensions:
Lesson 1: Do your homework. This is true in every
aspect of life, and applies here too. All the basic python tutorials
I did were invaluable in seeing how to structure an efficient script.
Looking in the Blenderartist.org forums helped a lot too. If you put
the effort into discovering the right way to do things, it will make
your job a whole lot easier later on. Learning Python before learning
Blender Python really helped to keep things straight.
Lesson 2:
Document your code. This is one of the big stress points in computer
science, and it is so helpful! If someone else wants to use parts of
your script, they shouldn't have to reconstruct what every line of
code does. If you put the script down for a month or two, you won't
remember what anything does, trust me. I know it's a drag. I know it
feels pointless. Please oh please, document your code. When looking
for examples, documentation helped me out immensely.
Once I had
done a few mini-scripts in Blender I started on the wall maker. As
the script progressed from making plain squares of wall to complex
walls with doors, windows, and edge features, I noticed a few other
things: Lesson 3: Programming Python extensions is not as hard as it
sounds. The extension framework in Blender includes some very
advanced tools which makes programing extensions rather elementary.
If you have an idea for a script, and have any confidence at all in
your programming skills, give it a shot!
Lesson 3 Coralary: But
it's harder than you think. Be prepared for frustrations. Even though
it's nice, the python-blender integration is far from perfect. The
logical way of doing things is often (but discouragingly not always)
how it will work. Be prepared to persevere through the tough spots.
While working on the script I had three other windows open. The
Python Scripting reference (accessible from inside Blender in the
Help menu), the Python package help menu, and the Blenderartist.org
scripting forum. These three, with lots of persistence, should guide
you through your seasons of scripting woes.
As the Script
progressed from simple to complex, I found myself discovering that my
original architecture was insufficient or highly inefficient for what
I was trying to do. I think I re-wrote every function at least once
from the ground up. Initially I was using the "Bevel Center"
script to do the beveling, but I had to re-code parts of it to make
it work from an outside call (which would require downloading an
altered version of Bevel Center along with Auto Masonry) and it was
very slow. In the end I bit the bullet and re-coded my basic block
function to include beveling. At the beginning of the project I had a
free form approach, which I abandoned after working a few days on it.
Here's the Fourth lesson:
Lesson 4: Be willing to re-think your
approach. Even if it means starting over. Every so often step back
and say to yourself, "Does it make sense to do it this way, or
is there a better way?" If you want a good script, always opt
for the better way. Sometimes it won't do quite what you had in mind,
but that's better than it not doing anything at all.
I still have
lots of features in mind for future development. I'm also thinking
that I will have to re-write a lot of the structure when I get back
to the project (in line with lesson 4). However, once the script was
mostly finished, it was time for:
The GUI! Writing the GUI can be
the most fun or most heartbreaking part of the process, depending on
how well you have managed your variables. If you have nicely written
functions and variable management, the gui should be pretty
straightforward. Writing a GUI in Blender is pretty easy, and really
finishes off the script. On the other hand, don't feel compelled to
include every feature in the GUI if it isn't well supported, or
reliable. There are several features in Auto Masonry which are almost
functional in the code, but not in the GUI. If your code is well
documented then code-heads will be able to use these features anyhow,
and not including them in the GUI helps reduce headaches for
entry-level users.
I'd like to improve this script in several directions.
Unfortunately my time is absorbed with other projects right now. Here
are a few of the things I'd like to add. If you have ideas for other
features please let me know:
Arches: Right now windows and doors
are flat topped. I'd like to add both round and pointed arches. This
will require significant re-coding of the basic architecture of the
script, but I think it will be worth it.
Flaws: Not all stones are
perfect. Some stones should have missing corners, or even cracks. An
early version (while using Bevel Center) was able to knock off
corners, but I haven't added that feature since converting to an
internal beveling scheme. Adding cracks would be even more difficult,
but I'm sure it is possible.
Grout: Right now the grout is simply
a second set of blocks behind the stones. On curved surfaces this
creates problems with the grout, which Subsurfacing helps, but
doesn't fix. A true stone grouting algorithm would also require a
major overhaul of the code, but would also create a much better
finished product, and would allow beveled grout.
More robust
window and door placement: Right now the GUI for the window and door
placement is rather limited. The script itself can accept any
configuration of window and door placement, but I couldn't figure out
how to simply implement the user interface. If there is a good way of
doing this, will someone let me know?
Persistent settings: the
ability to save settings to a file would make it easier to tweak
settings. It would also allow the creation of multiple walls with
"offset edges" that will mesh with one-another, or angled
corners with interlocking edges. Unfortunately, this would also
require a similar code overhaul.
So basically, when I am feeling
up to another few weeks of programming, I'll rewrite the script to be
better than ever. When I do, I will try to include any feature
requests I receive in the meantime. Alternatively, if someone else is
feeling bold, I encourage you to make changes to the script yourself.
I'd be happy to learn of all the improvements that can be made, and
I'm sure there are many.
I hope this script allows many of you to realize your dreams of realistic castles, brick walls, roads, textures, towers, and anything else you can do with it. I'd be thrilled if you'd drop me a line and let me know what you're using it for. Let me know if you run across any bugs, and I'll try to fix them right away. Happy Blending!